

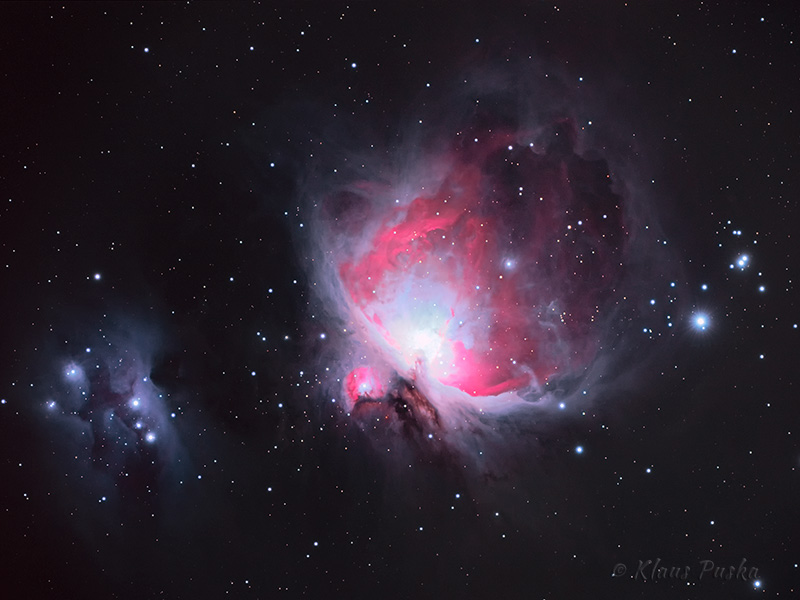
M42 – Orion Nebula
For those of you who are obsessive about technical details, love to tweak technology without manuals or directions, and have a very high frustration tolerance, astrophotography may be for you. My experience has shown that most photographers of the enthusiast and above level are technofiles, with a keen affinity toward precision gadgets, be it cameras, iPads, or watches. Enter the astrograph, a telescope designed at least in part for astrophotography, and the motorized equatorial mount, which together take the need for precision to absurd new heights. Pixel peeping is not only recommended for developing the craft of astrophotography, but is pretty much a requirement. Discovering that the smallest stars in my photographs are 3×4 pixels instead of 3×3 pixels, in other words that my stars aren’t round, is cause for many nights worth of tweaking and heading scratching. In the sport of astrophotography, an improvement of 1 pixel is considered a success. If you usually don’t have the patience to use a tripod for your landscapes, you can stop reading now, because your shiny new telescope will simply end up on eBay. Now that I’ve scared off the run and gun photographers, let’s get down to a few things that I’ve learned by trial and error, with an emphasis on error.
There are essentially three main challenges to astrophotography, your subject is usually small, always in motion, and very dim. In other words, astrophotography is hard because of the precision required to get round stars with the long exposures needed for dim, highly magnified celestial objects. The earth spins on its axis and creates an apparent motion of the heavens. To stop that motion in a photograph, so as not to have star trails, you need either a very short exposure or the ability to exactly counter the earth’s rotation with a telescope mount that tracks in precisely opposite direction and speed. The only celestial objects that are bright enough to use short exposures are the sun, moon, and to some extent a couple of planets. Pretty much everything else needs tracking. While the motion of the stars to the unaided eye is imperceptible over a few seconds, like watching the hour hand of a clock, the high magnification of a telescope also magnifies that motion. With long focal length telescopes and no tracking mount, the stars will zoom out of view in a few seconds, leaving streaks across your photographs as evidence of their passing. As the telescope focal length and corresponding magnification increases, so does the requirement for precision tracking and precision optics. Likewise, the cost of the system quickly increases to the point where you could buy a new car instead. I decided to get in at the moped level.
Beginner’s recommendation number one is to park your ego at the door and start with a short focal length telescope. This advice is prolific in books on astrophotography, but I chose to ignore it anyway… sort of. By short I mean not more than 800mm, and preferably shorter, because magnification magnifies errors and that makes life more difficult. At shorter focal lengths, some telescopes overlap with super telephoto camera lenses which, incidentally, are another good option for learning the craft. Since the first challenge of astrophotography is that your subject is generally small, you’ll need to find a compromise between enough magnification to properly frame your chosen subject and not so much as to make precision tracking requirements unattainable. Fortunately, there are a surprising number of larger galaxies and nebulae that benefit from the wider field of view of shorter focal length telescopes. In fact, there are several nebulae that are too big to frame in my, ah, over 800mm scope. Choosing a telescope is no different than choosing a camera lens. You first have to decide on a range of subjects, for example wildlife, and then choose the appropriate focal length for that subject. In astrophotography, you’ll have an easier time of it if you start out photographing elephants rather than sparrows.
Choosing a telescope for beginning astrophotography starts with deciding on a basic design. Mass produced telescopes, of the variety most of us can afford, come in three main flavors: Refractors, Newtonians, and Cassegrains. Refractors are the telescope equivalent of a telephoto camera lens, with clear glass lens elements that magnify and project the image into the eyepiece or onto the camera sensor plane.
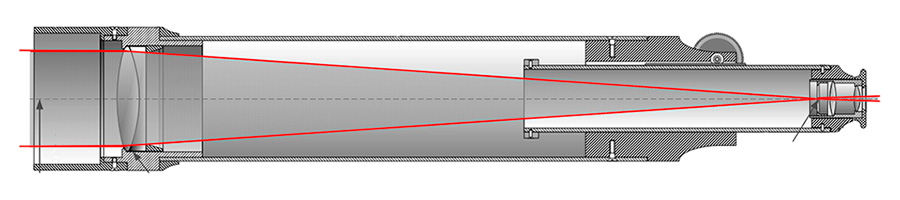
Refractor Telescope
Newtonians use a curved mirror to magnify the image and a flat secondary mirror to redirect the light to the camera or eyepiece. Using mirrors instead of lenses has the advantage of not introducing chromatic aberrations, but does present other challenges.
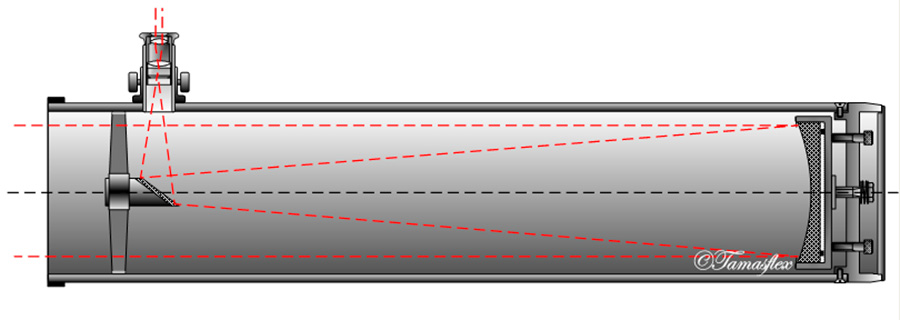
Newtonian Telescope
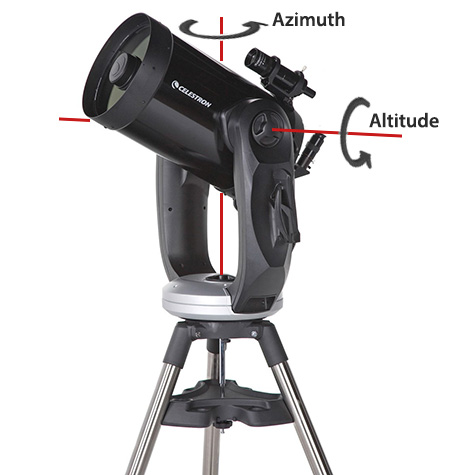
Cassegrains use a combination of curved mirrors to magnify and fold the light path, and lenses to correct the image. Cassegrains were popularized in part because the folded light path allows for a compact design. They are, however, difficult instruments to use for astrophotography because of their inherently long focal lengths (usually 2000mm and up) and corresponding precision tracking requirements.
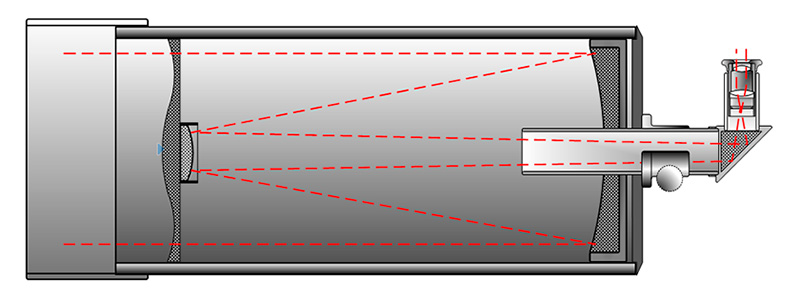
Schmidt Cassegrain Telescope
Newtonians and refractors are better options for beginning astrophotography because they are easier to design with shorter focal lengths. Newtonians make fine beginner astrographs because mirrors are cheaper to produce than lenses and so short focal length Newtonians, with relatively large apertures, can be had at reasonable prices. The downsides to this type of scope is that their relatively large optical tube assemblies (OTAs) can be cumbersome, and the two mirror system requires precise alignment of the mirrors (collimation) to get those precious round stars. Also, both Cassegrain and Newtonian telescopes have a secondary mirror which is a central obstruction in the light path, in effect casting an out of focus shadow over the image and reducing the overall contrast.
By comparison, refractors have the simplest light path, without a central obstruction, making for a telescope that is easy to maintain and produces high contrast images. They are also commonly designed with short focal lengths. The downside to refractors is that the refracting properties of glass adds chromatic aberration, also known as color fringing. To correct for this, some designs use multiple elements, just like a camera lens. Of course this adds to the cost of manufacture and makes good refractors the most expensive type of telescope for a given size. In sum, you can get a larger aperture, brighter Newtonian for the price of a much smaller refractor. A refractor, however, will produce higher contrast images and require less maintenance than a Newtonian. Both Newtonians and refractors designed with imaging in mind make good beginner astrographs. For the record, I went with an Explore Scientific 127mm (5 inch) f/7.5 apochromatic refractor. The calculated focal length of 952mm is on the high side for starting out, making things more difficult than need be. For astrophotography, you’ll test that frustration tolerance less with a shorter focal length telescope that requires less precision from your tracking mount.
Beginner’s recommendation number two is that the mount is more important than the telescope. This is because in astrophotography, your subject is always in motion. While the quality of the optics definitely has an impact on the image, the precision and stability of the tracking mount is more likely to be the limiting factor in getting satisfying images. This is no different from landscape photography, where lots of megapixels and expensive glass are wasted without the use of a sturdy tripod and excellent technique. Your images will be better if you over buy a mount and under buy a telescope, rather than the other way around. Unlike mundane terrestrial tripods, however, telescope mounts suitable for astrophotography are actually kinda sexy… in a technofile sort of way. They are computer controlled, precision clocks with the ability to cancel the earth’s rotation from your camera’s perspective.
There are two basic types of motorized mounts, Altitude Azimuth (Altazimuth) mounts and Equatorial mounts. Altazimuth mounts have two axes, one for the Altitude or vertical position and one for the Azimuth or horizontal position. They are the paradigm of simple and intuitive to use… but unfortunately not ideal for astrophotography. The reason is that an Altazimuth mount keeps the telescope and camera from rotating as it tracks stars up, across, and down the sky, while the apparent path of the stars is rotational. If you imagine a camera connected horizontally to the Cassegrain telescope on the altazimuth mount shown below, the camera’s horizon line would remain level no matter where the mount was pointing. Celestial objects, however, appear to rotate in our sky and would thus rotate on the camera’s image sensor. While altazimuth mounts are excellent for visual use and can be modified for astrophotography, you’ll still be better served with a mount specifically designed to cancel the earth’s rotation.
Altazimuth Mount
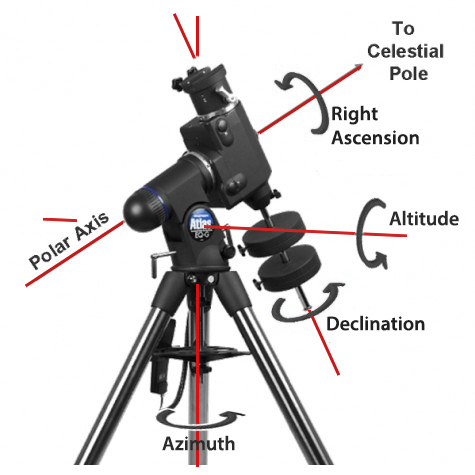
Equatorial Mount
Enter the venerable equatorial mount and its four axes of confusion. As you can see from the image above, the equatorial mount still has altitude and azimuth adjustments, to which have been added right ascension and the declination axes. So now you have to think in four dimensions… not really. But you do have to orient the right ascension axis to the celestial pole using altitude and azimuth adjustments. Huh? In principle, the design is the simplest and most elegant way of cancelling the earth’s rotation and accurately tracking celestial objects. The idea is that using the altitude and azimuth adjustments, you align the right ascension axis to be precisely parallel to the earth’s axis of rotation. This process is called polar alignment, because the earth rotates about its poles. In theory, if the right ascension axis is accurately polar aligned, the mount only needs to rotate, opposite the earth, about its right ascension axis to cancel the earth’s rotation and accurately track the path of the heavens.
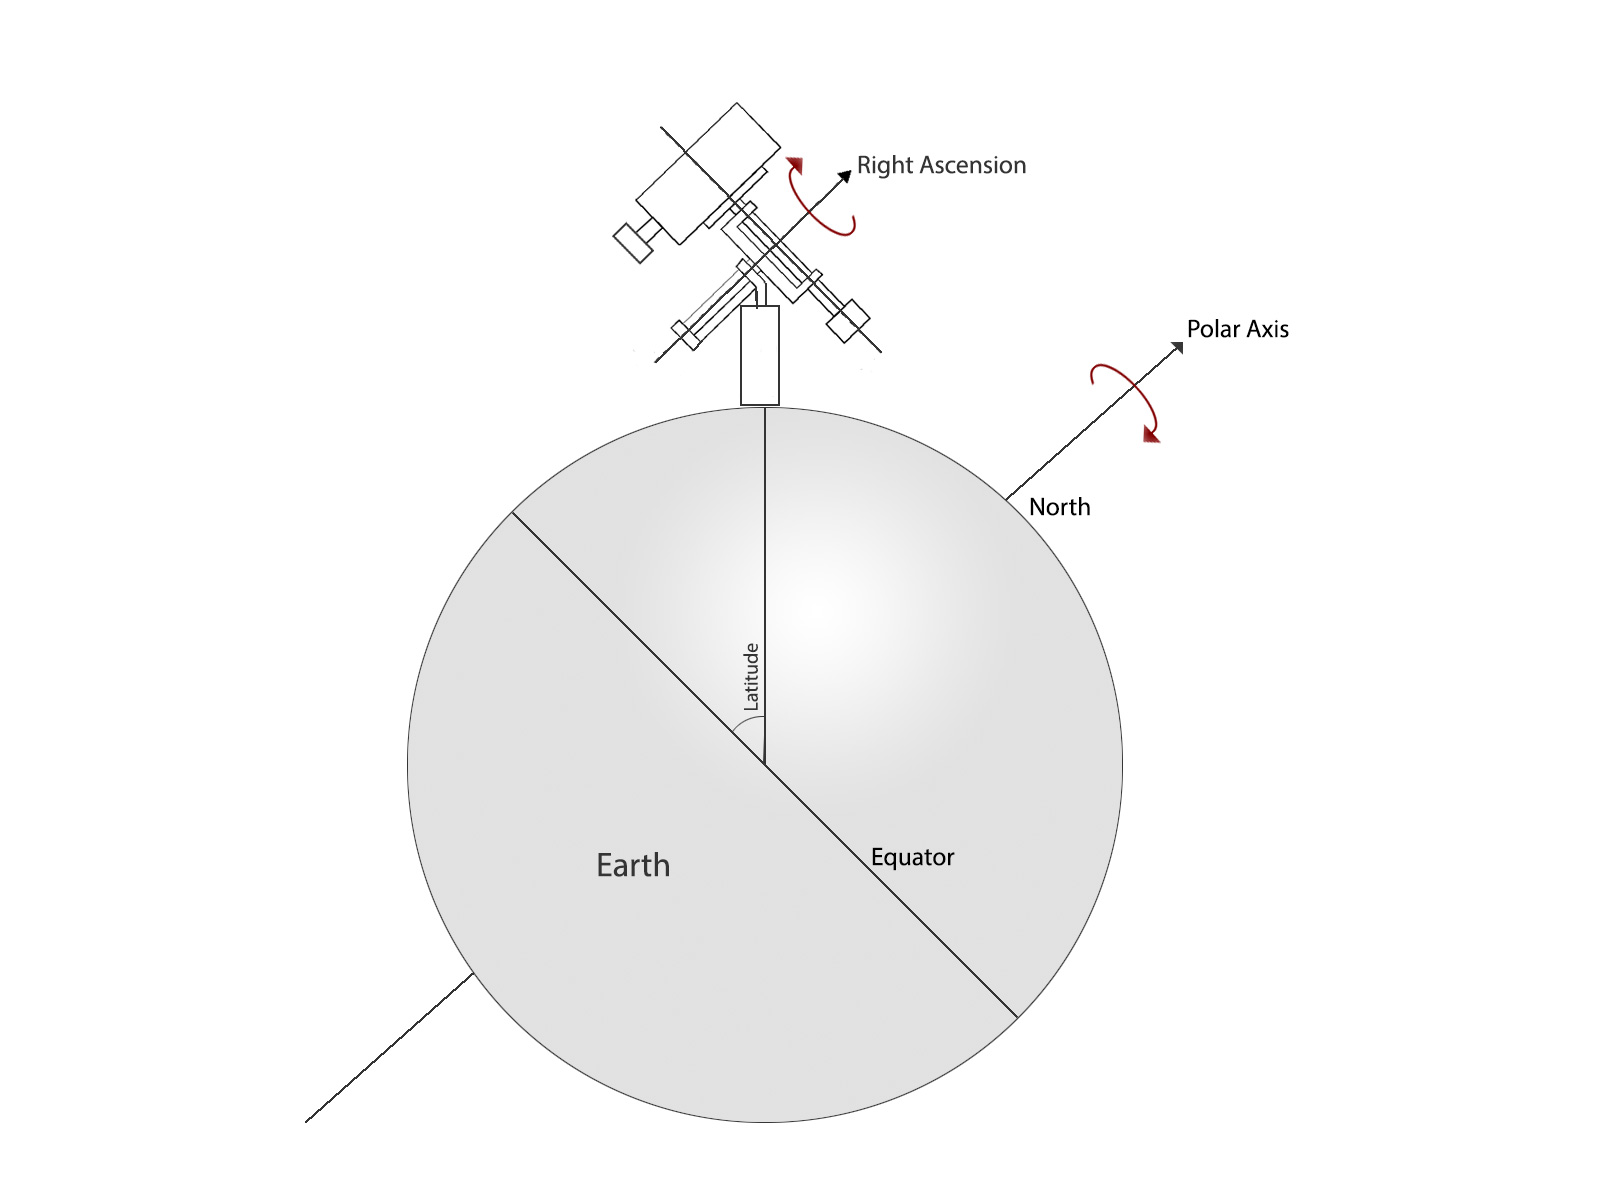
Equatorial Mount Polar Alignment
I say “in theory” because nothing in astrophotography is quite that simple. For starters, the difficulty in doing a precise polar alignment should not be under estimated. Being even 1/4th of a degree off will result in the dreaded oblong stars. How accurate do you need to be? My very limited experience suggests that polar alignment for a roughly 1000mm telescope needs to be better than 5 arc minutes, or 1/12th of degree, to get round stars with just a 2 minute exposure. Longer exposures and longer focal lengths require more accuracy. Of course, there are tools and routines for helping the polar alignment process. But that’s for another discussion. Another significant thing to consider is that in manufacturing everything is built to a price point. The moped level equipment that I’m using, which still exceeds the cost of many professional camera lenses and tripods, isn’t built to sufficiently tight tolerances to simply point, track, and shoot. My mount, the Orion Atlas EQ6 pictured above, needs help from software and other hardware to compensate for its mechanical shortcomings. Not to disparage the Orion Atlas, which is 76 pounds of steel, brass, plastic, and electronics, and costs about the same as my Gitzo carbon fiber tripod with a ball head. In fact upon further reflection, it seems like a downright good deal and makes me wonder just why the heck Gitzos are so expensive. But I digress. The take away message here is that for astrophotography you need a computer controlled, motorized equatorial mount to track celestial objects during long exposures. And that you should expect entry level equipment, such as the Orion Atlas, to need a little help from guiding software and hardware. Indeed, the mount is likely to introduce much more error into your star images than any aberrations in the optics. So in general, your mount should cost as much or more than your telescope.
Beginners recommendation number three, now that I’ve scared off all but the most ardent technofiles and stargazers, is that you don’t need a specialized astrophotography camera because your DSLR will work just fine. There are, of course, astrophotography specific cameras, complete with built in sensor cooling; but, for getting started, most interchangeable lens cameras are plenty good enough. The only thing you need is an adapter to attach your camera to the telescope. This is essentially a hollow tube with an appropriate camera mount on one end. The proboscis like camera adapter slides into the focuser of the telescope and locks in place with thumb screws. The telescope, in effect, becomes a giant manual focus lens.

Canon With Telescope Adapter
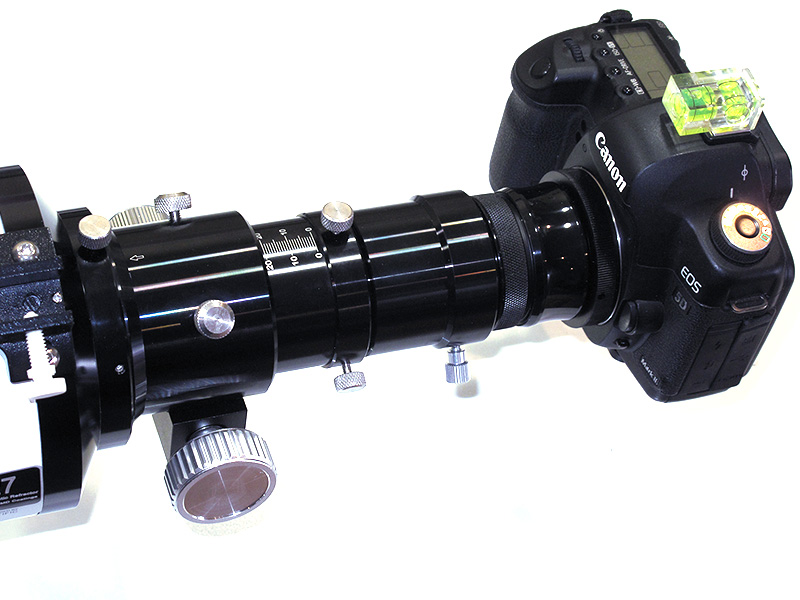
Canon Attached To Telescope
As an aside, the strange looking filter screwed into the end of the camera adapter is a light pollution filter. The vast majority of us live in or near cities where the glow of street lamps pollute the sky and obscure the stars. Fortunately, the worst offenders are sodium and mercury vapor lamps that emit fairly narrow spectrums of light. Light pollution filters block those specific parts of the spectrum and transmit the rest. By blocking part of the visible spectrum of light, however, the amount of light reaching the camera sensor is attenuated, much like using a polarizing filter, and requires a longer exposure. See above, “the mount is more important than the telescope”.
The only special camera requirements for astrophotography are that the camera is an interchangeable lens type, has a bulb mode for long exposures, and can shoot raw. If you’ve avoided raw file formats because you don’t want to fiddle with image processing, you’re in for a rude awakening. Astrophotography has more layers of processing than a royal wedding cake. One thing to know up front is that Canon and Nikon cameras are well supported by available astrophotography software. Sony and Olympus have some support; whereas for the rest of the pack, software options are pretty thin. If you don’t already have an interchangeable lens camera, an inexpensive used Canon with an APS-C sized sensor is a good starting point.
Sensor size does enter the equation when matching a telescope to the camera. A full frame DSLR or mirrorless camera will require a larger image circle at the focal plane. Telescopes with small image circles will vignette on full frame sensors, and even on some APS-C sensors. Unfortunately, telescope manufacturers don’t publish things like image circle size and corresponding MTF graphs until you start to approach five figure ($$$$$) instruments. Most telescopes that bill themselves as astrographs will do an adequate job on APS-C sized sensors. If you’ve got a full frame camera, you’ll have to contact companies directly and ask about image circle sizes for specific models. My Explore Scientific 127mm APO refractor just barely covers the full frame sensor of a Canon 5DII, creating about 2 stops of vignetting in the corners. Additionally, field curvature and coma make for elongated, out of focus stars in the corners. For this, I’ve added a field flattener/corrector lens in the image train. You can see how in astrophotography things get progressively more complicated and expensive as you chase ever better images. Unless you already have a full frame camera, an APS-C camera will make life simpler and cheaper.
We’re finally on to imaging. Once the camera is attached to the telescope focuser, you can use either the camera’s magnified live view or a tethered laptop to focus on a star. At this point it becomes apparent that focusing a giant lens, with a paper thin depth of field, on a barely visible object, is not trivial. Only the brighter stars will show on the camera or laptop screen, and it’s not terribly clear when they’re at their sharpest. To add even more uncertainty to the process, atmospheric turbulence enters the scene when looking at highly magnified star images. The star images can fluctuate, flutter, and move around as if you’re looking through a rippling pond. Tethering your camera to a laptop and using astrophotography software such as BackyardEOS, can be indispensable for focusing because it provides a live numerical read out of the star width. To get best focus, you simply rock the focuser gently back and forth until you get the lowest number.
Now that we have our mount polar aligned and tracking, our camera attached and focused, it’s finally time to compose and expose. There’s just one problem… with very few exceptions, you can’t actually see your subject on the camera lcd or laptop screen. Like a pilot flying at night, you have to navigate by instrument. For navigation, planetarium software such as Stellarium or Cartes du Ciel can be indispensable. These free, open source applications run on your laptop and connect to your telescope via ASCOM, a universal Windows driver for all astronomy devices. And incidentally, most astronomical software is available only for Windows, requiring MAC users to install something like Boot Camp to run Windows software. Once your planetarium software is connected to your mount, you can slew the scope to your subject, whether you can see it or not. With a properly aligned mount, the software will place your object of interest smack in the middle of the frame. To refine the composition, perhaps rotating the camera or placing your subject off center, you’ll need to take a series of exposures just long enough so you can see your subject and make iterative adjustments to the camera and telescope orientations.
OK, now that we finally have our… ahem, short focal length telescope aimed at our subject, our mount accurately aligned and tracking, a DSLR focused and composed, we have enough pieces in place to capture our first astrophotography data. That’s what it’s often referred to by veterans of the craft, data rather than images. The final challenge in astrophotography is that the vast majority of subjects are incredibly dim. So dim, in fact, that they usually require multiple long exposures, stacked by yet more astronomical software, such as Deep Sky Stacker, to help tease the image data out of the camera’s back ground noise. So we need to setup up the camera tethering software to capture a series of long exposures. Exactly how long will depend on your telescope’s focal ratio, or f-stop in photographic terms, the ISO you choose for your camera, and the brightness of your subject. For my setup, I’ve found 2 minute exposures at f/7.5 and ISO 400 to be about the minimum for brighter celestial objects. Somewhere in the 5-10 minute range per exposure at ISO 400 seems about right.
The image of Andromeda Galaxy is a single 5 minute exposure at ISO 800. The image was heavily processed to bring out the relatively limited image data found in a single frame. Andromeda, like almost all celestial objects, will benefit from stacking multiple long exposures. Through stacking, image noise, which results from high ISOs and long exposures, can be averaged out and subtracted from the stacked image files. This leaves cleaner image data that is not lost in background noise and results in better detail and color. You can expect an imaging session of several hours to include only a couple of subjects. Most of the time is spent acquiring a series of sub frames, or subs, of each subject for eventual stacking and processing.
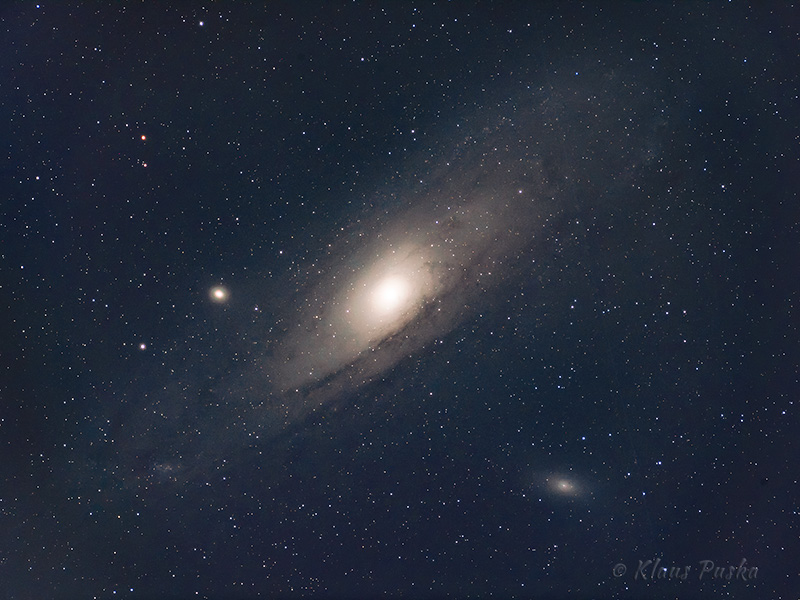 M31- Andromeda Galaxy
A night’s imaging session starts with setting up and aligning the mount so that it can accurately counter the earth’s rotation, then attaching the telescope, camera and any other filters or lenses in the optical train. The telescope mount must be connected to planetarium software so to be able to target invisible objects. The camera is then tethered and focused with the aid of astronomical software. After an hour or so, you’re finally ready to compose and expose. Exposures of your subjects, referred to as “Lights”, typically consist of a series of a dozen or more 5-10 minute images. During this time, the mount is tracking your stars and hopefully keeping them fixed at the pixel level on your camera’s sensor. See above, “the mount is more important than the telescope”.
At the end of the evening, there is still more work to do. You’ll need to take a series of dark frames, or “Darks”, to aid in processing. Darks are essentially images taken at the same temperature, with the same exposure time and ISO as your Lights, but with the lens cap on. This records only the internal thermal noise patterns of your camera’s sensor that build up with long exposures. Data from your Darks is later subtracted from your Lights to get cleaner images. You may also want to take some “Flats”, or images with a light diffuser over the telescope. Flats record the vignetting present in your system and are later used to even out the dark sky background. Finally, Bias frames are very short (1/8000 second) darks, essentially recording the inherent noise patterns of your camera’s sensor before any thermal noise is generated. All this information is used in the processing phase of astrophotography to clean up your images to the point where you can expand actual image data into a usable photograph. As you might imagine, astronomical image processing is topic unto itself… but for another time.
Astrophotography is a game of patience and persistence. It requires a great deal of data to elicit dim celestial objects from noisy backgrounds. Many hours and nights can be spent photographing the same subject, accumulating images that are stacked and processed in pursuit of ever better renderings of some truly stunning subjects. The craft is one of precision and compensation. There are a dizzying array of tools, both hardware and software, that compensate for the lack of precision in our mounts, our optics, and our camera’s electronics. While acquiring and mastering these tools can be a daunting task, pushing limits of both patience and bank accounts, the rewards are a glimpse into the depths of our spectacular universe and perhaps a little cosmic perspective.

Leave A Comment