

The truth is that most artworks sell because they match the ottoman, or the curtains, or fit the blank spaces on the wall. To be sure, artistic composition and technical execution come into play. But, by and large, art is purchased as decoration and needs to fit in with the surrounding decor. And there are no blank spaces on the wall more wanting of art than the tall and narrow spaces between the large windows of contemporary homes, a perfect place for vertical panoramas.
But… human eyes have a field of view that is distinctly horizontal, presumably because we had no evolutionary predators that hunted us from above. Perhaps if Hatzegopteryx had made it to the Pleistocene era, things would be different. But as it is, a healthy pair of human eyes can see about 180 degrees horizontally and 130 degrees vertically without eye or head movement. This field of view has an aspect ratio somewhere between 3:2 and 4:3, which are conspicuously the two most common aspect ratios of digital cameras. But human vision is not static, rather our eyes are constantly scanning our surroundings and the visual cortex of the brain continuously builds an image that is broader than our static field of view. This field of vision can encompass a horizontal view as great as 270 degrees without head movement, giving our field of vision an aspect ratio of about 2:1, the same proportion as some panoramas. Horizontal panoramas are appealing precisely because they emulate our natural field of vision. We are horizontal creatures and as a consequence, vertical panoramas tend to be the last composition that occurs to landscape photographers.
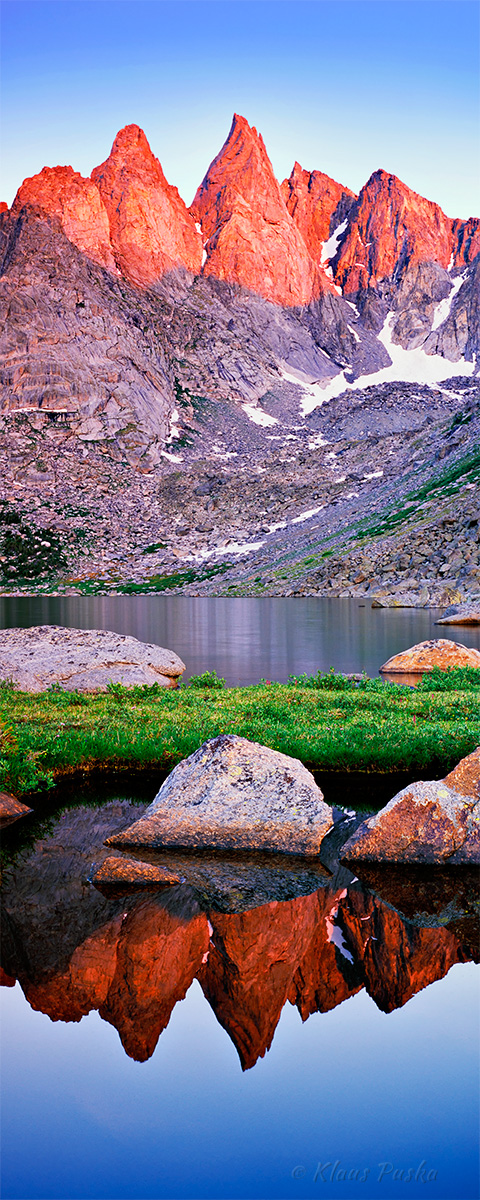
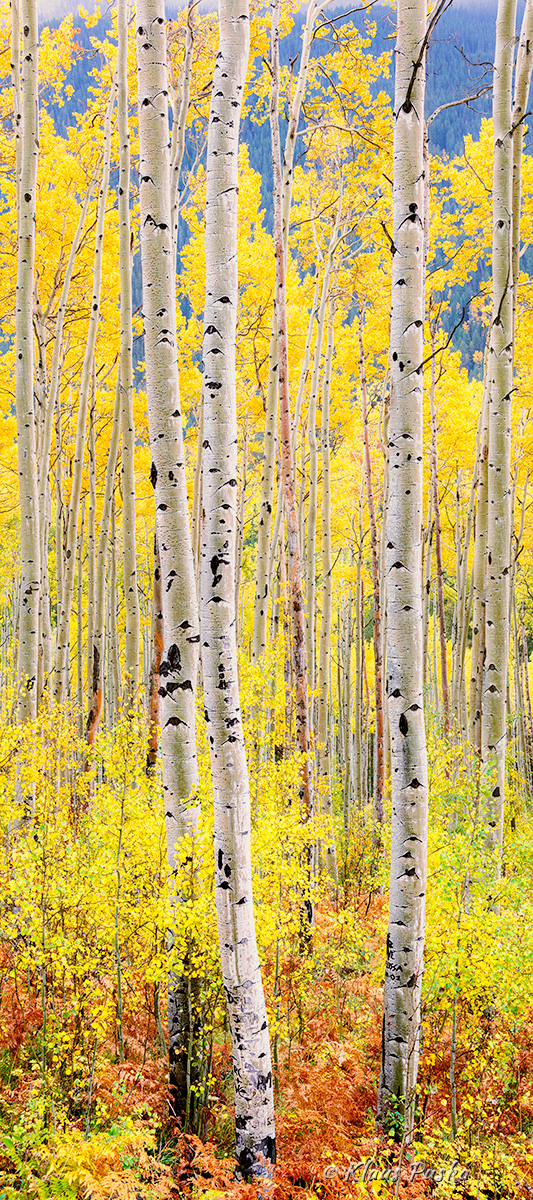
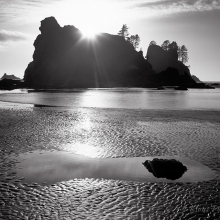
Art as decoration aside, vertical panoramas can be very compelling compositions in their own right. They can add a sense of scale to vertical subjects that is often lost in horizontal compositions. Tall trees, narrow slot canyons, wispy waterfalls and soaring summits all lend themselves to tall and narrow compositions. Indeed, vertical panoramas are often the best way to isolate and showcase some subjects. The rules of composition for vertical panoramas can be slightly different than for their more squat counterparts. The rule of thirds (dividing a composition vertically into thirds) doesn’t apply as well here. The rule of fourths or fifths works better for vertical panoramas. The sky and corresponding reflection in “Alpine Glow of the Winds” both occupy about a fifth of the composition. If I had used the rule of thirds, there would have been too much empty space and the scale of the subject would have been diminished. As a general rule, the closer your subject reaches to the top edge of the frame, the taller your subject appears. The strongest composition is, of course, your artistic choice to make.
Just as with horizontal panoramas, vertical panoramas can be created in one of two ways, cropping or stitching. Cropping a single image to emphasize the vertical scale of your subject is a simple task that can be explored in your image editing program. Image editors provide the luxury of experimenting in real time and changing the crops until you’re satisfied. The disadvantage of cropping is the loss of megapixels. And megapixels determine how large you can print. “Alpine Glow of the Winds” was cropped from a high resolution scan of medium format, 6x7cm Fuji Velvia film. The cropped file in this case is 4800×12000 pixels, or about 57mp, enough to print a panorama about 4 feet tall. Making the same crop of an image from a 24mp DSLR, however, would leave only about 12mp to work with, and result in a significantly smaller print. Whether cropping is right for you depends on your camera’s resolution and how large you’d like to print.
If you want to go big, stitching is the answer. Since the quality of the stitched image depends on careful composition and image alignment, you won’t be surprised that I recommend using a tripod. There are a few basic rules to follow when shooting multiple frames for any panorama, horizontal or vertical. First, level your tripod so that the panning motion of the tripod head isn’t tilted. Tilted frames will require more cropping and some of the resolution advantage of shooting multiple frames will be lost. Second, lock your exposure so that adjacent frames have the same exposure. You want all the frames for a panorama stitch to have the same exposure so that the finished image is consistent and looks like it was from a single frame. And finally, overlap your frames at least 25% so that there are enough common elements between frames for good alignment. This usually requires doing a dry run from the start to the end of your composition to see how many frames are needed for good overlap. These basic rules apply to panoramas created from multiple frames, regardless of orientation.
Creating a set of images to stitch a vertical panorama, however, presents some unique challenges. The panning bases on most tripod ball heads, the most common type used in the field, are designed to pan horizontally, not vertically. In their normal orientation, you cannot isolate the vertical axis and panning vertically is no more accurate than hand holding. Aside from buying a specially designed ball or gimbal head (read expensive – Arca Swiss Monoball Z1dp) for vertical panning, there are thankfully some other options. Many ball heads allow you to unscrew the camera attachment plate, remove the ball head from the tripod, reattach it upside down, and attach the camera plate directly to the underside of the panning base. Operating a ball head upside down puts the panning base on top and allows you to pan vertically by tilting the panning base perpendicular to your leveled tripod. An upside down ball head also functions as a leveler for the panning base, allowing you to create perfectly aligned horizontal panoramas without leveling your tripod. The only drawback to this method is that the camera can only be in a vertical orientation while panning vertically and a horizontal orientation when panning horizontally.
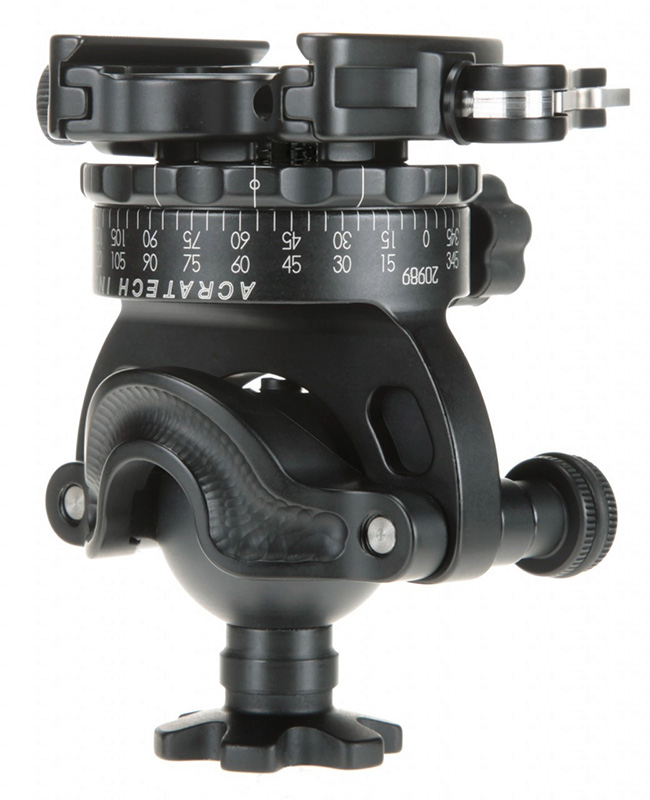
Inverted Acratech Ball Head
To maximize the resolution of a stitched panorama, the camera must be mounted perpendicular to the panning direction. In other words, for a horizontal panorama you’ll be stitching vertical frames and the opposite for a vertical panorama. This can be accomplished with a Pan & Tilt head or by using a tripod capable of moving the center column into a horizontal position, as discussed below. A Pan & Tilt head allows each axis to be controlled individually, letting you level the panning base, then the camera, then pan vertically without changing the other two axes. The camera can be positioned either vertically or horizontally before panning. Stitching horizontal images into a vertical panorama makes full use of the sensor width and creates the most detailed final images. Fortunately, pan/tilt heads are common and tend to be less expensive than their ball head counterparts. If you already have one, you’re set.
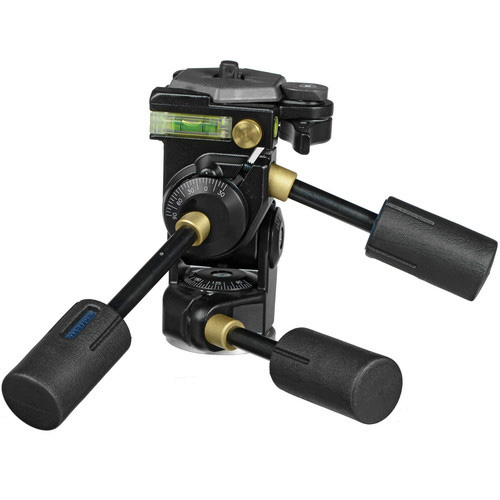
Manfrotto Pan & Tilt Head
Finally, by using a tripod capable of moving the center column into a horizontal position, as shown below, the panning base of a ball head can be easily moved into a vertical orientation. This allows you to isolate the vertical axis while panning. It also allows full ball head movement so that the camera can be positioned either vertically or horizontally while capturing images for your vertical panorama. Of course, not all tripods can do this trick and it may not be in the budget to acquire one. If you should, however, be in the market for a new tripod, it’s worth looking at these versatile tools because they also provide great flexibility for macro compositions. The pictured tripod is part of the Gitzo Explorer series. But similar functionality is also available from other manufacturers, such as Manfrotto, Benro, and Oben. The combined versatility of a tripod with a tilting center column and a ball head provide almost limitless compositional opportunities.
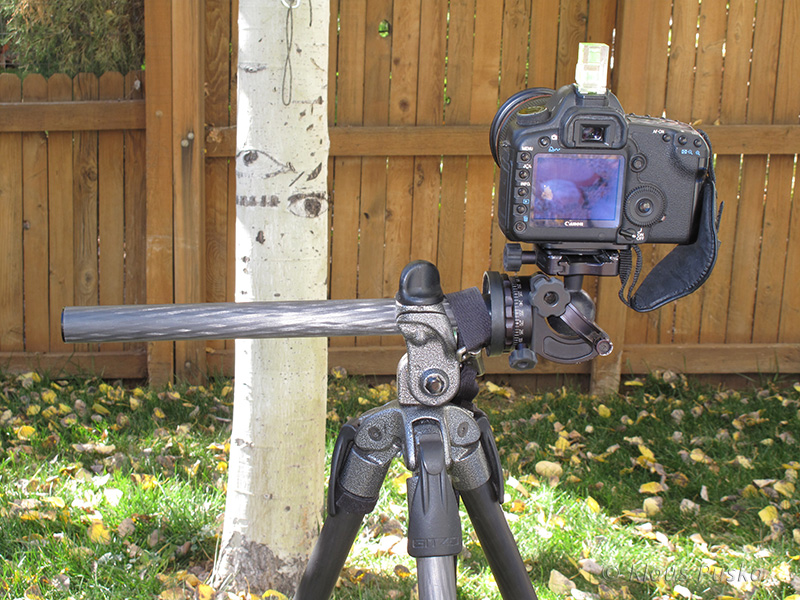
Horizontal Center Column
The day might come, heaven forbid, that you find yourself without a tripod and have before you a compelling, narrow vertical composition. Hand holding a panorama can, of course, be done; however, there are a few caveats. Since alignment while hand holding your camera is guess work at best, expect more of the image to be cropped, as shown in the diagram below. The red box shows the useful overlap area. If you frame your composition too tight, some important parts of your subject might be lost. The solution is to include more on each side of your composition than you intend to have in the final, cropped image. You can do this by either moving back from your subject or zooming out, if you’re using a zoom lens. Since some of the sensor’s resolution will be lost to cropping, it’s more important here to take advantage of the sensor’s full width and shoot horizontal frames for a vertical panorama. Incidentally, all panorama functions built into cameras crop quite a bit of the image, leaving a you with less resolution than you might expect. More on that below. When hand holding and shooting multiple frames for a panorama, vertical or horizontal, zoom out a little and overlap your frames at least 25% on each side. This will ensure there is enough overlap for a good stitch and that you won’t loose anything important when the stitch is cropped. Also, as with all panoramas, shoot either with a fixed manual exposure, or auto exposure lock, so that adjacent frames have the same exposure.
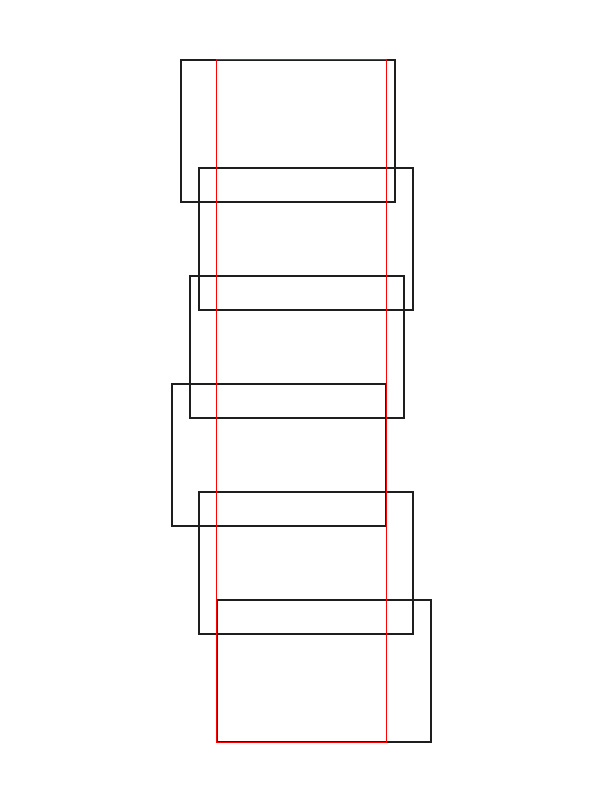
Crop of Misaligned Images
As a last resort, there’s the in camera panorama feature available in some cameras. Using this is OK for on screen images and small prints, just realize that the final image will be cropped, reduced in resolution, and the output will always be a jpeg. As an example, I made two panoramas of the same scene with a Sony A7RII, a 42mp camera. One was using multiple overlapping images that were stitched together in post processing, the other used the in camera panorama feature to stitch them on the spot. The image from the in camera stitch is about 1800×5400 pixels, resulting in a 10mp panorama from a 42mp camera. The image from stitching multiple separate frames, on the other hand, is 4800×14400 pixels, which is about 70mp or enough to make a print larger than 2×6 feet. Additionally, in camera stitching requires constant camera movement during the exposure which also reduces sharpness. In short, using in camera panorama features is good for small prints and on screen viewing, but not really an option for larger prints. In the following example (my position and the light changed a little between shots), the loss in resolution when using the in camera panorama feature is obvious. Click on the crops below see the difference in resolution and sharpness between in camera panorama stitching and post process stitching.
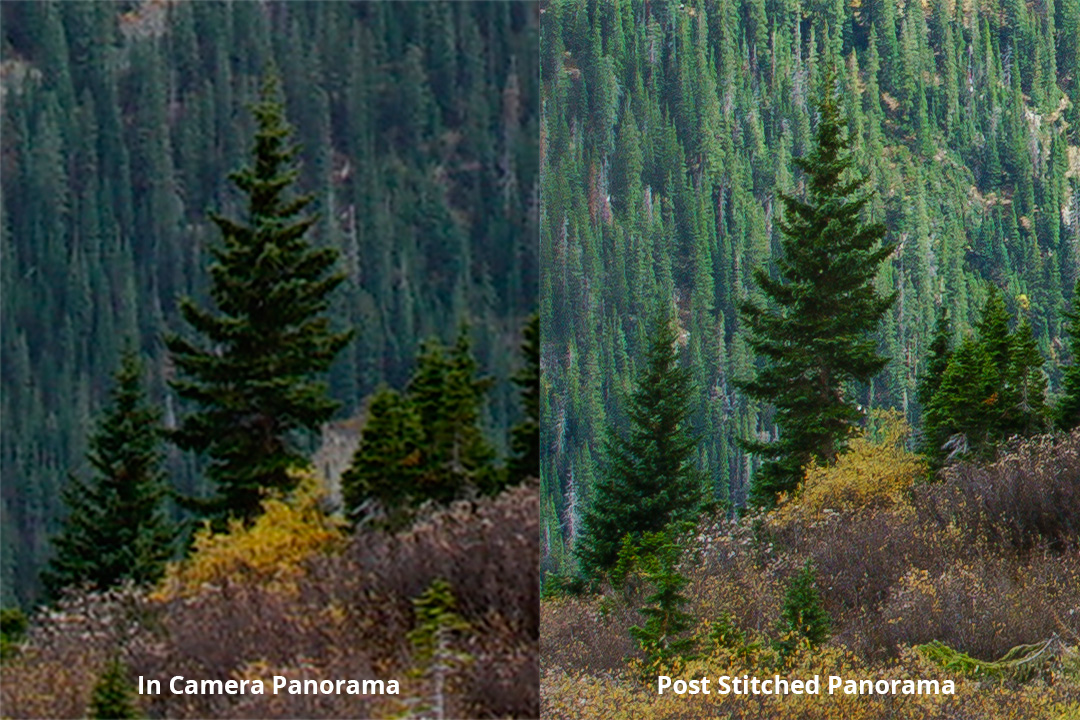
Comparison of in camera panorama feature and post process stitching.
Clearly, the preferred method for creating vertical panoramas for print is to capture multiple overlapping frames on a tripod. Keep in mind that there are additional steps required to pan vertically and have the frames align accurately. Once step up on a tripod, I always practice the panning sequence to see how many frames it will take to capture my whole subject. I also always start the sequence at the ground and pan up. This allows me to carefully choose the foreground and somehow seems to be the natural way we examine our vertical world. Once I’ve determined the start and end points of my composition and how many frames it will take to complete the sequence, I set the manual exposure to account for the all the frames, making certain that the highlights in the sky are not lost. Since most vertical panoramas cover a wide range of focal distances, like from the grass at your feet to the tops of trees, it’s usually best to stop down for maximum depth of field. Finally, I focus about a third of the way into the composition to help ensure as much as possible is sharp. The last step in the capture process, of course, is to actually shoot the sequence. Stitching and other post process work will be covered in another article.
Whether carefully composing on a tripod or hand holding your panoramas, finding vertical compositions opens the door to a new category of creative landscapes. It’s a bit like discovering the small scale of macro photography, and suddenly noticing a new dimension to a world you thought you knew. It is also often the best way to emphasize certain subjects, be it towering mountain spires or the slender reach of trees skyward. A vertical panorama can shake us refreshingly from our habitually horizontal world. Sometimes it’s just good to have a little headroom. And while vertical panoramas are probably the least common type of image composition, they’re often the easiest to hang because of all those blank vertical spaces on the wall.
Leave A Comment