

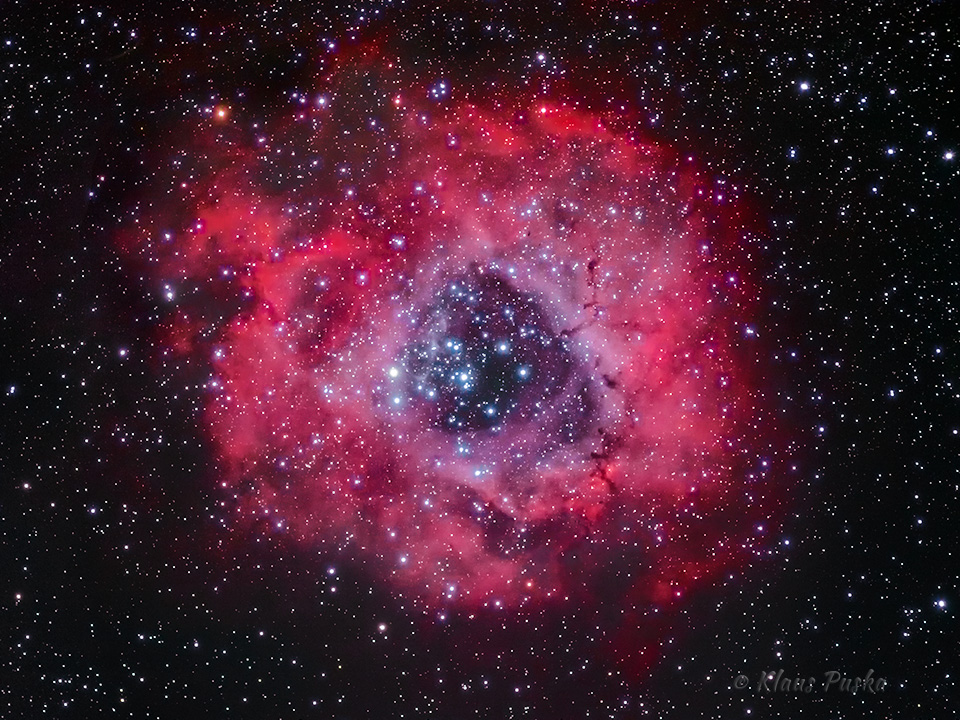
Rosette Nebula
The digital revolution has created unprecedented possibilities for the amateur astrophotographer. Through the use of digital cameras, computerized telescope mounts, and advanced image processing, relative neophytes can capture cosmic wonders from the comfort of their backyards. Broadly speaking, astrophotography can be divided into two phases, capture and processing, just like its terrestrial counterpart. My article Introduction To Astrophotography outlines some of the basic nuts and bolts of capturing astro image data, leaving the less appetizing chore of processing to be discussed here. Specifically, this article covers the basic processing workflow for images of deep space objects such as nebulae, galaxies, and the like. The brighter and relatively near objects in our solar system are special cases best dealt with separately. While the learning curve for astro image processing is steep, the results often strike me a bit like magic… out of nothing emerges the sparkling light show of our cosmos.
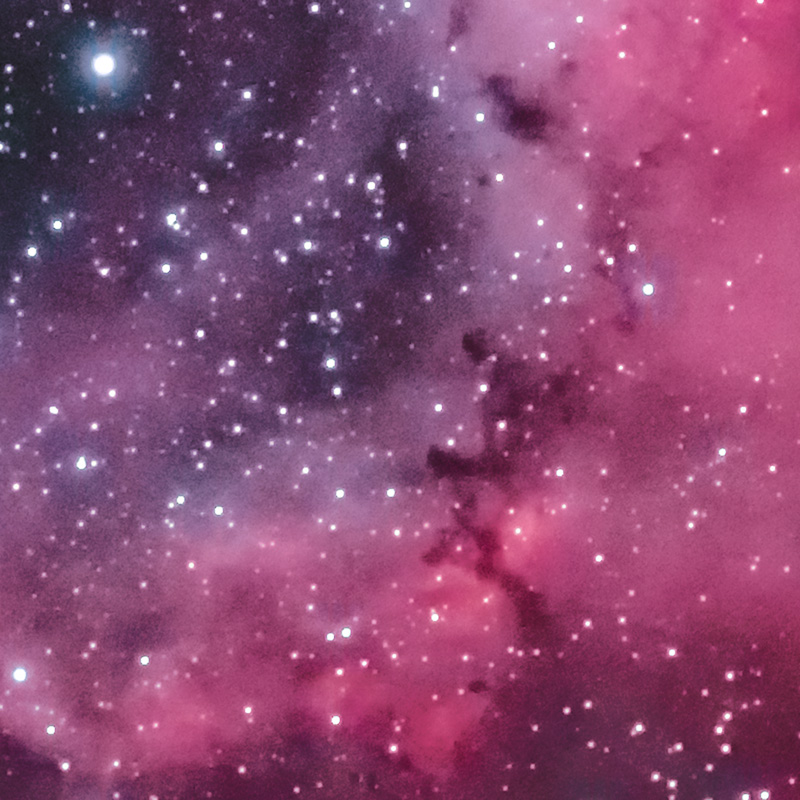
Astro image processing differs from terrestrial landscape photography, or any other form of traditional photography, in one fundamental way: Deep space objects (DSOs) are generally very dim and the signal to noise ratio is so low that sometimes it seems the camera has captured nothing at all. The image of the Rosette Nebula pictured here is one such example. The first few times I photographed this nebula, the structure and colors were so faint that I wasn’t sure I had even pointed the telescope in the right direction. All that could be seen in the frame was a field of stars through the tapestry of light pollution and some faint, reddish noise. To bring out the color and structure of the nebula requires “stretching” the image data more than is ever done with a terrestrial photograph. Stretching in this context means expanding contrast and color saturation so to emphasize the faint signal of the object. The principle challenge in astro image processing is that expanding the signal also expands the noise, usually to the point where an image is unusable. Let me say at the outset, the workflow for astro image processing can be complex and not for the faint of heart.
Reducing the background noise and bringing out the faint structure and color in deep space objects generally requires a two step process, stacking and post processing. The first step is to stack multiple images of the DSO in stacking software such as the free Deep Sky Stacker (DSS). The software calulates the mean or median (user’s choice) of each pixel in the stack. By doing this, random noise is averaged out and real image information remains. Also included in the stack are what are known as dark frames, flat frames, and bias frames, each addressing a different type of fixed noise or image aberration. These are then subtracted from the image, further reducing bad data. This whole first step in the astro image processing workflow is known as image calibration and is meant to remove as much noise or non-image data as possible while leaving good image data intact.
The second step in the astro image processing workflow is the post processing of your calibrated image with more traditional image processing techniques found in Lightroom and Photoshop. Once you have calibrated an image, it becomes possible to stretch the image data and emphasize otherwise faint structures and colors without too much damaging noise. These more traditional forms of image processing include things like enhancing contrast and saturation, as well as more common forms of noise reduction and sharpening. While the bag of tricks is deep for making these celestial jewels shine, I’ll only touch on the basics that are most commonly used in the workflow.
The following images show the Rosette Nebula in the first stages of the astro image processing workflow. To begin, there is the dull, lifeless image of a star field with just a hint of the nebula’s color and structure. The image is a single frame unprocessed RAW file, exposed 15 minutes at ISO400 with an unmodified Canon 5DII attached to a 5 inch APO refractor. The RAW file was only resized and converted to a JPEG to make it manageable for the web. The gray haze is from light pollution and threatens to overwhelm what little information there is about the nebula itself. The second image shows what happens if you simply try to enhance the image by pushing the contrast and saturation without stacking and calibrating multiple frames.
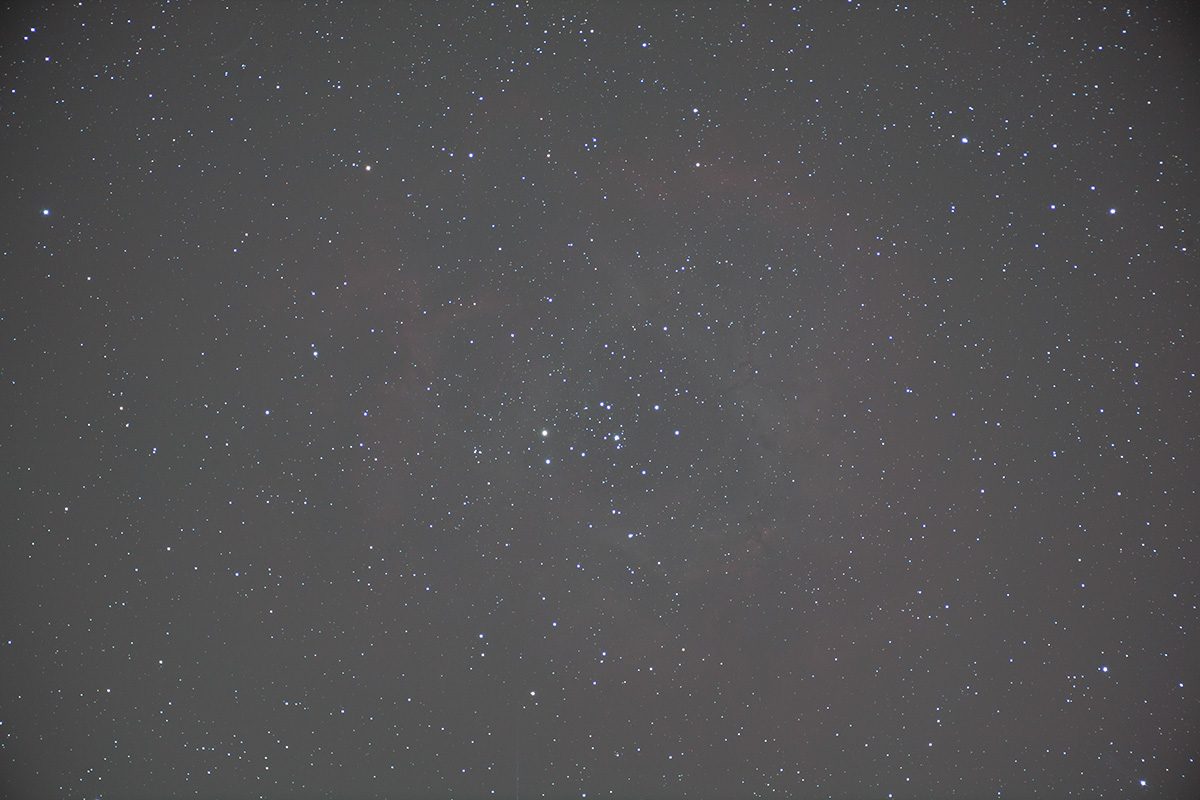
Rosette Nebula Single Frame RAW
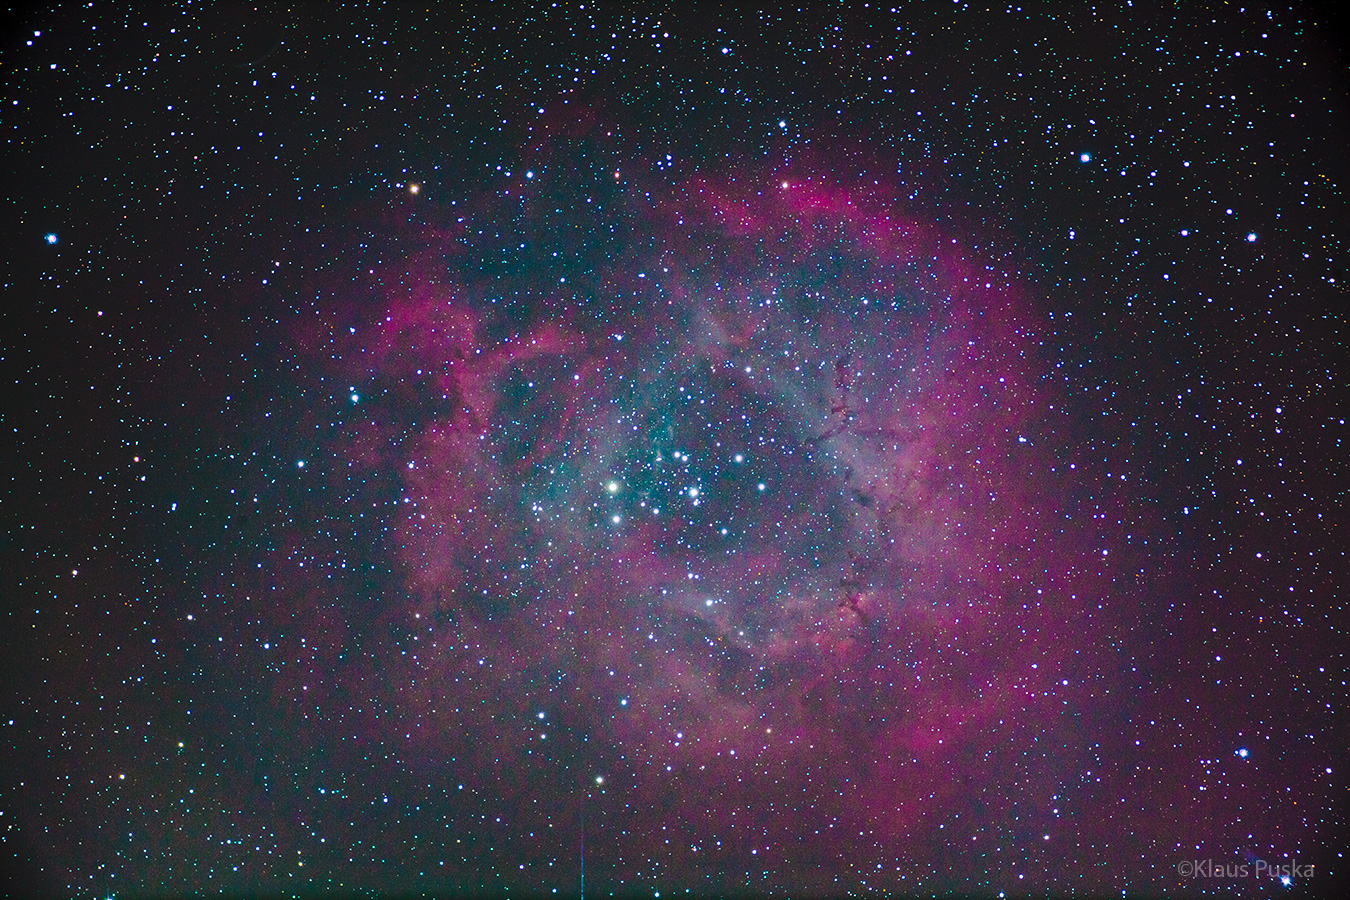
Rosette Nebula – Single Frame Processed
Several things become apparent in the single frame processed version. There’s a significant amount of color noise throughout the image, the background is very uneven do to vignetting and sensor heating, and there appears to be a light trail at the bottom of the image, likely from a satellite. You’d be surprised how often satellites and planes will fly through your composition. But it’s on closer inspection of the full resolution crop that it becomes clear that there is simply too much noise in a single frame to allow the image to be pushed this hard. Compare it to a crop of a stacked and processed version of the same shot. The difference is dramatic.
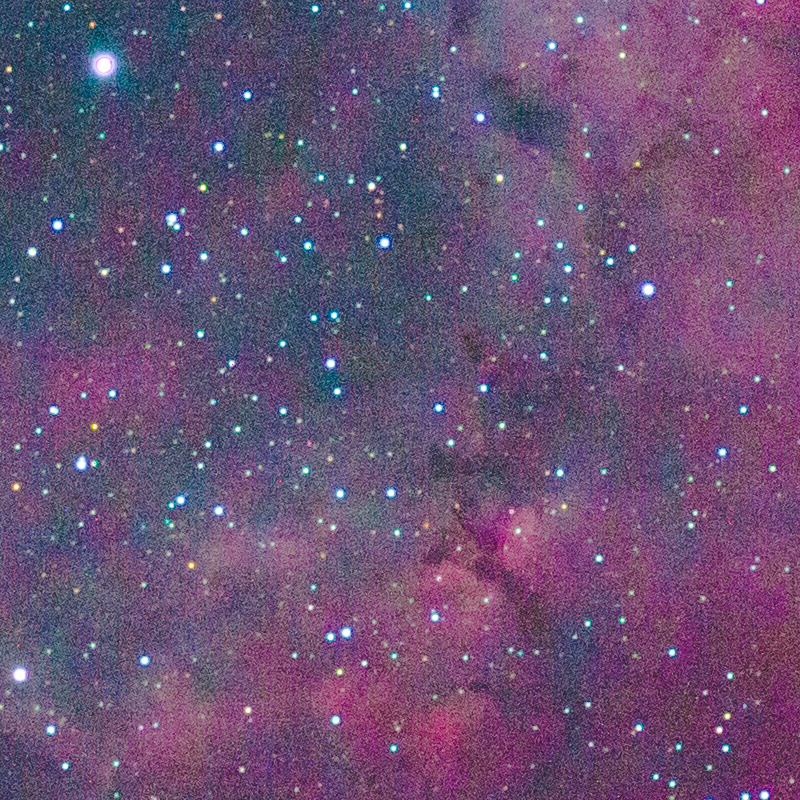
Rosette Nebula – Single Frame Processed 100% Crop
Rosette Nebula – Stacked and Processed 100% Crop
Your image stack should include four types of frames, lights, darks, flats, and bias frames. All frames must be camera raw files, jpegs need not apply. Lights are just the actual shots of the DSO itself. The stacking software can align the images and account for small variations between frames. As a rule, including four frames in the stack will reduce the noise by half, 16 frames will half it again, essentially eliminating 75% of the noise, and so on. A quick calculation shows that you will have been under the stars imaging for half the night to get 16x 15 minute images for your stack. You can also use images from multiple nights and even different equipment in your stack, provided that the compositions largely overlap. This step in the stacking software eliminates random noise by figuring the mean or median of each pixel position. Once aligned, the stars in the stack will be in the same pixel location, so that the mean or median of those pixel values will still be a star. The random noise, however, will be different for each image in the stack and will average out, reducing the apparent noise. The value of being able to calculate the median, as opposed to the mean, is that outliers, such as the satellite trail, will be discarded and vanish from the final data. No cloning necessary.
There are, unfortunately, other gremlins in our astro images that need to be tamed. Not all noise is random and therefore can’t be eliminated by the method above. Two types of fixed pattern noise found in long exposures of dim subjects are thermal noise and bias noise. Thermal noise is charge accumulation from heat buildup that occurs when leaving the sensor and camera electronics on for many minutes at a time. Thermal energy adds charge to the pixel sites causing some pixels to “glow” more than others. The internal electronics of the camera can also generate heat unevenly, possibly warming one part of the sensor more than another. Fortunately, that noise pattern is relatively consistent for a given sensor, exposure time, ISO, and temperature. Dark frames are simply exposures taken with the same exposure time, ISO, and temperature as the light frames, but with the lens cap on. In essence, you’re just recording the thermal noise patterns when shooting dark frames. This also includes hot or dead pixels. Bias frames are similar to dark frames, except the exposure time is the shortest possible, say 1/8000th of second. Bias frames essentially record the background electronic noise inherent in the sensor and supporting circuitry, without the additional thermal effects of long exposures. The noise patterns from both the dark and bias frames are then subtracted from the stacked image.
At this point, we’ve eliminated much of the random and fixed pattern noise from our stacked image. There remains, however, one more type of non-image data that is usually prevalent in astro images, namely the uneven distribution of light due to vignetting and obstructions. All optics vignette or darken near the edges of the image circle. If the image circle of a given camera lens or telescope is insufficiently large to evenly cover a sensor from corner to corner, then edge shading will occur. This is the situation with all but the most rarefied optics simply because creating lenses with large, even image circles is expensive. The diagram below shows how vignetting of a full frame optic affects the corners of two common sensor sizes. Obviously, a smaller sensor that only uses the central and relatively even portion of an image circle will be less subject to vignetting. The flat frame shown below is one of the actual flats used in the Rosette Nebula image highlighted in this article. It clearly shows the vignetting inherent in the imaging train, as well as a few dust bunnies (circled) from sensor dust. Finally, the stacked image data is divided by the flat frame data to eliminate vignetting and shading caused by other obstructions. It is also possible to remove vignetting and dust through other means, but not with this level of precision.
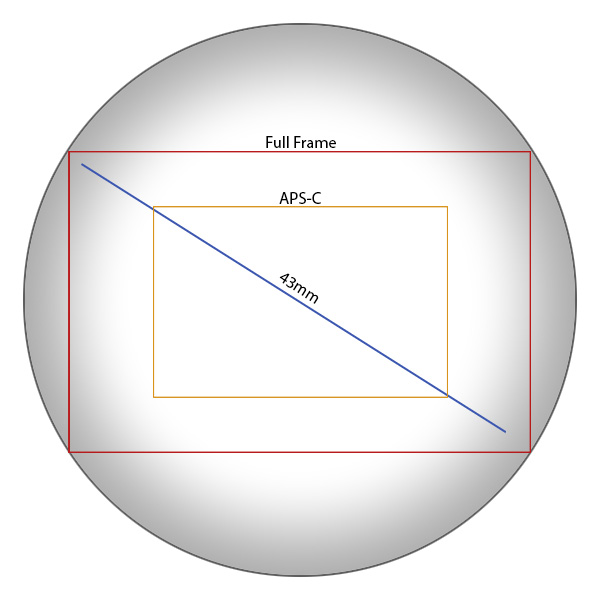
Full Frame Image Circle Vignetting
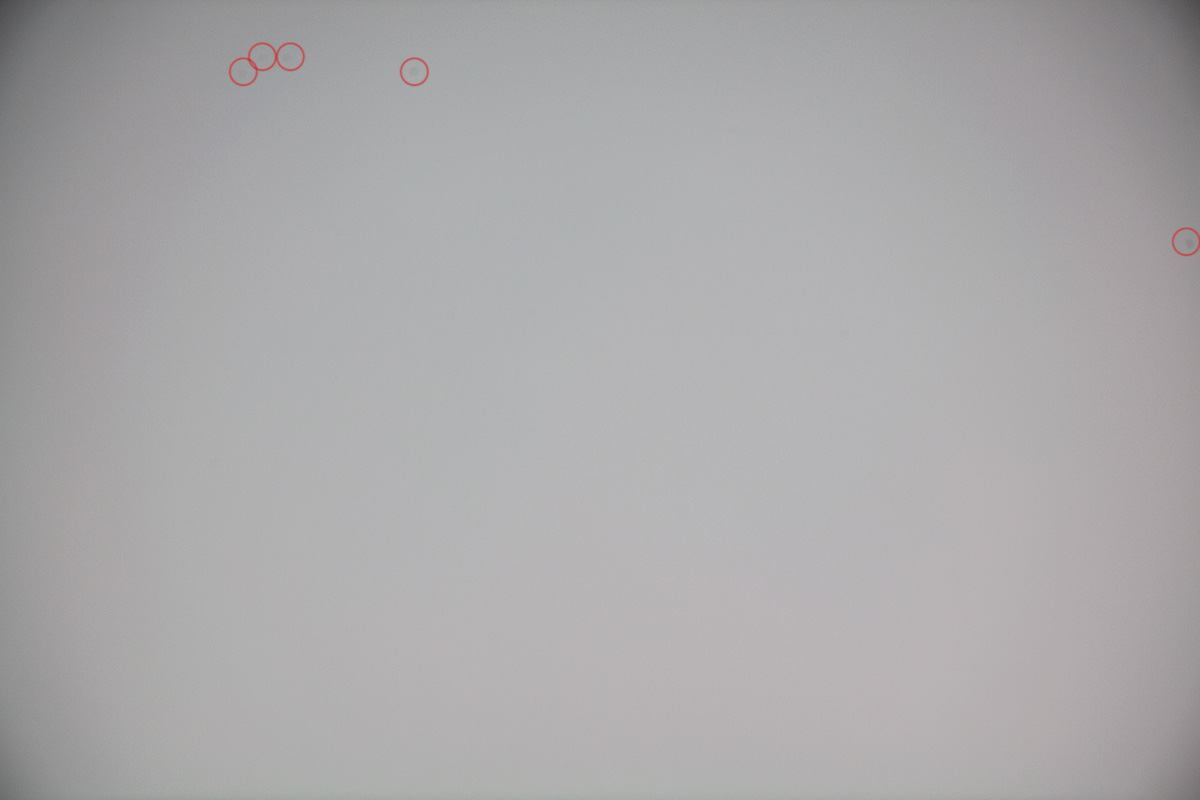
Astrophotography Flat Frame
At right is a screen shot of Deep Sky Stacker (DSS) software with the file list for the Rosette Nebula image. There are a total of 60 x 21MB raw files being stacked in this particular example. It gets the computer thinking. The list includes lights, darks, flats, and bias frames, though I only had 10 good light frames at the time of creating this example. More would have been better. DSS starts with a long list of 16bit camera raw files and outputs a calibrated 32bit TIF file that allows for a tremendous amount of stretching. Fortunately, DSS automates most of the process and does the calculations in the background.

Deep Sky Stacker – File List
Once we have a calibrated image attained through the stacking process, we can start the post processing stage of astro imaging. As mentioned, photographing dim, deep space objects is plagued by a poor signal to noise ratio. Image calibration goes a long way to minimizing noise and other non-image data in our file, but does not amplify the signal. Amplifying the signal is done in post processing. Much of the post processing done in Lightroom and Photoshop will be familiar to anyone with experience in either of these applications. Because many of the processing techniques can be done by both programs, I’ll focus here on the basic Lightroom adjustments, as I find Lightroom more intuitive and accessible.
My workflow consists of two parts, global adjustments and local adjustments. I always work from global to local, from the big picture down to the details. Global adjustments, whether in Lightroom or Photoshop, are simply image adjustments that affect the whole picture. These include tonal and color adjustments, as well as things like noise reduction and sharpening. Local adjustments are similar, except for selecting only local areas of an image for adjustment. For astro image processing in Lightroom, there are five panels in the Development module that get used regularly. I am assuming some familiarity with Lightroom here. The Basic, Tone Curve, and HSL panels do most of the dramatic adjustments, while the Detail and Lens Corrections panels work more on the fine detail level. The next image shows a before and after split view of the Rosette Nebula in Lightroom’s Develop module. Notice that the before image is similar to the unprocessed raw shown above, but with less noise and greater bit depth for amplifying (stretching) the image. Click on the image to get a better look at some of the settings used to coax color and structure from the unprocessed file.
The Basic panel includes most of the general color and tonal adjustments. The first step in stretching the image data is to crank the Clarity, Vibrance, and Saturation sliders to 100%. We may need to reduce these later. This amplifies the faint color and structure in the image and allows you to assess the correct color balance. To correct the color, we adjust the White Balance sliders until the background of space is neutral, because we know that space has no color cast.
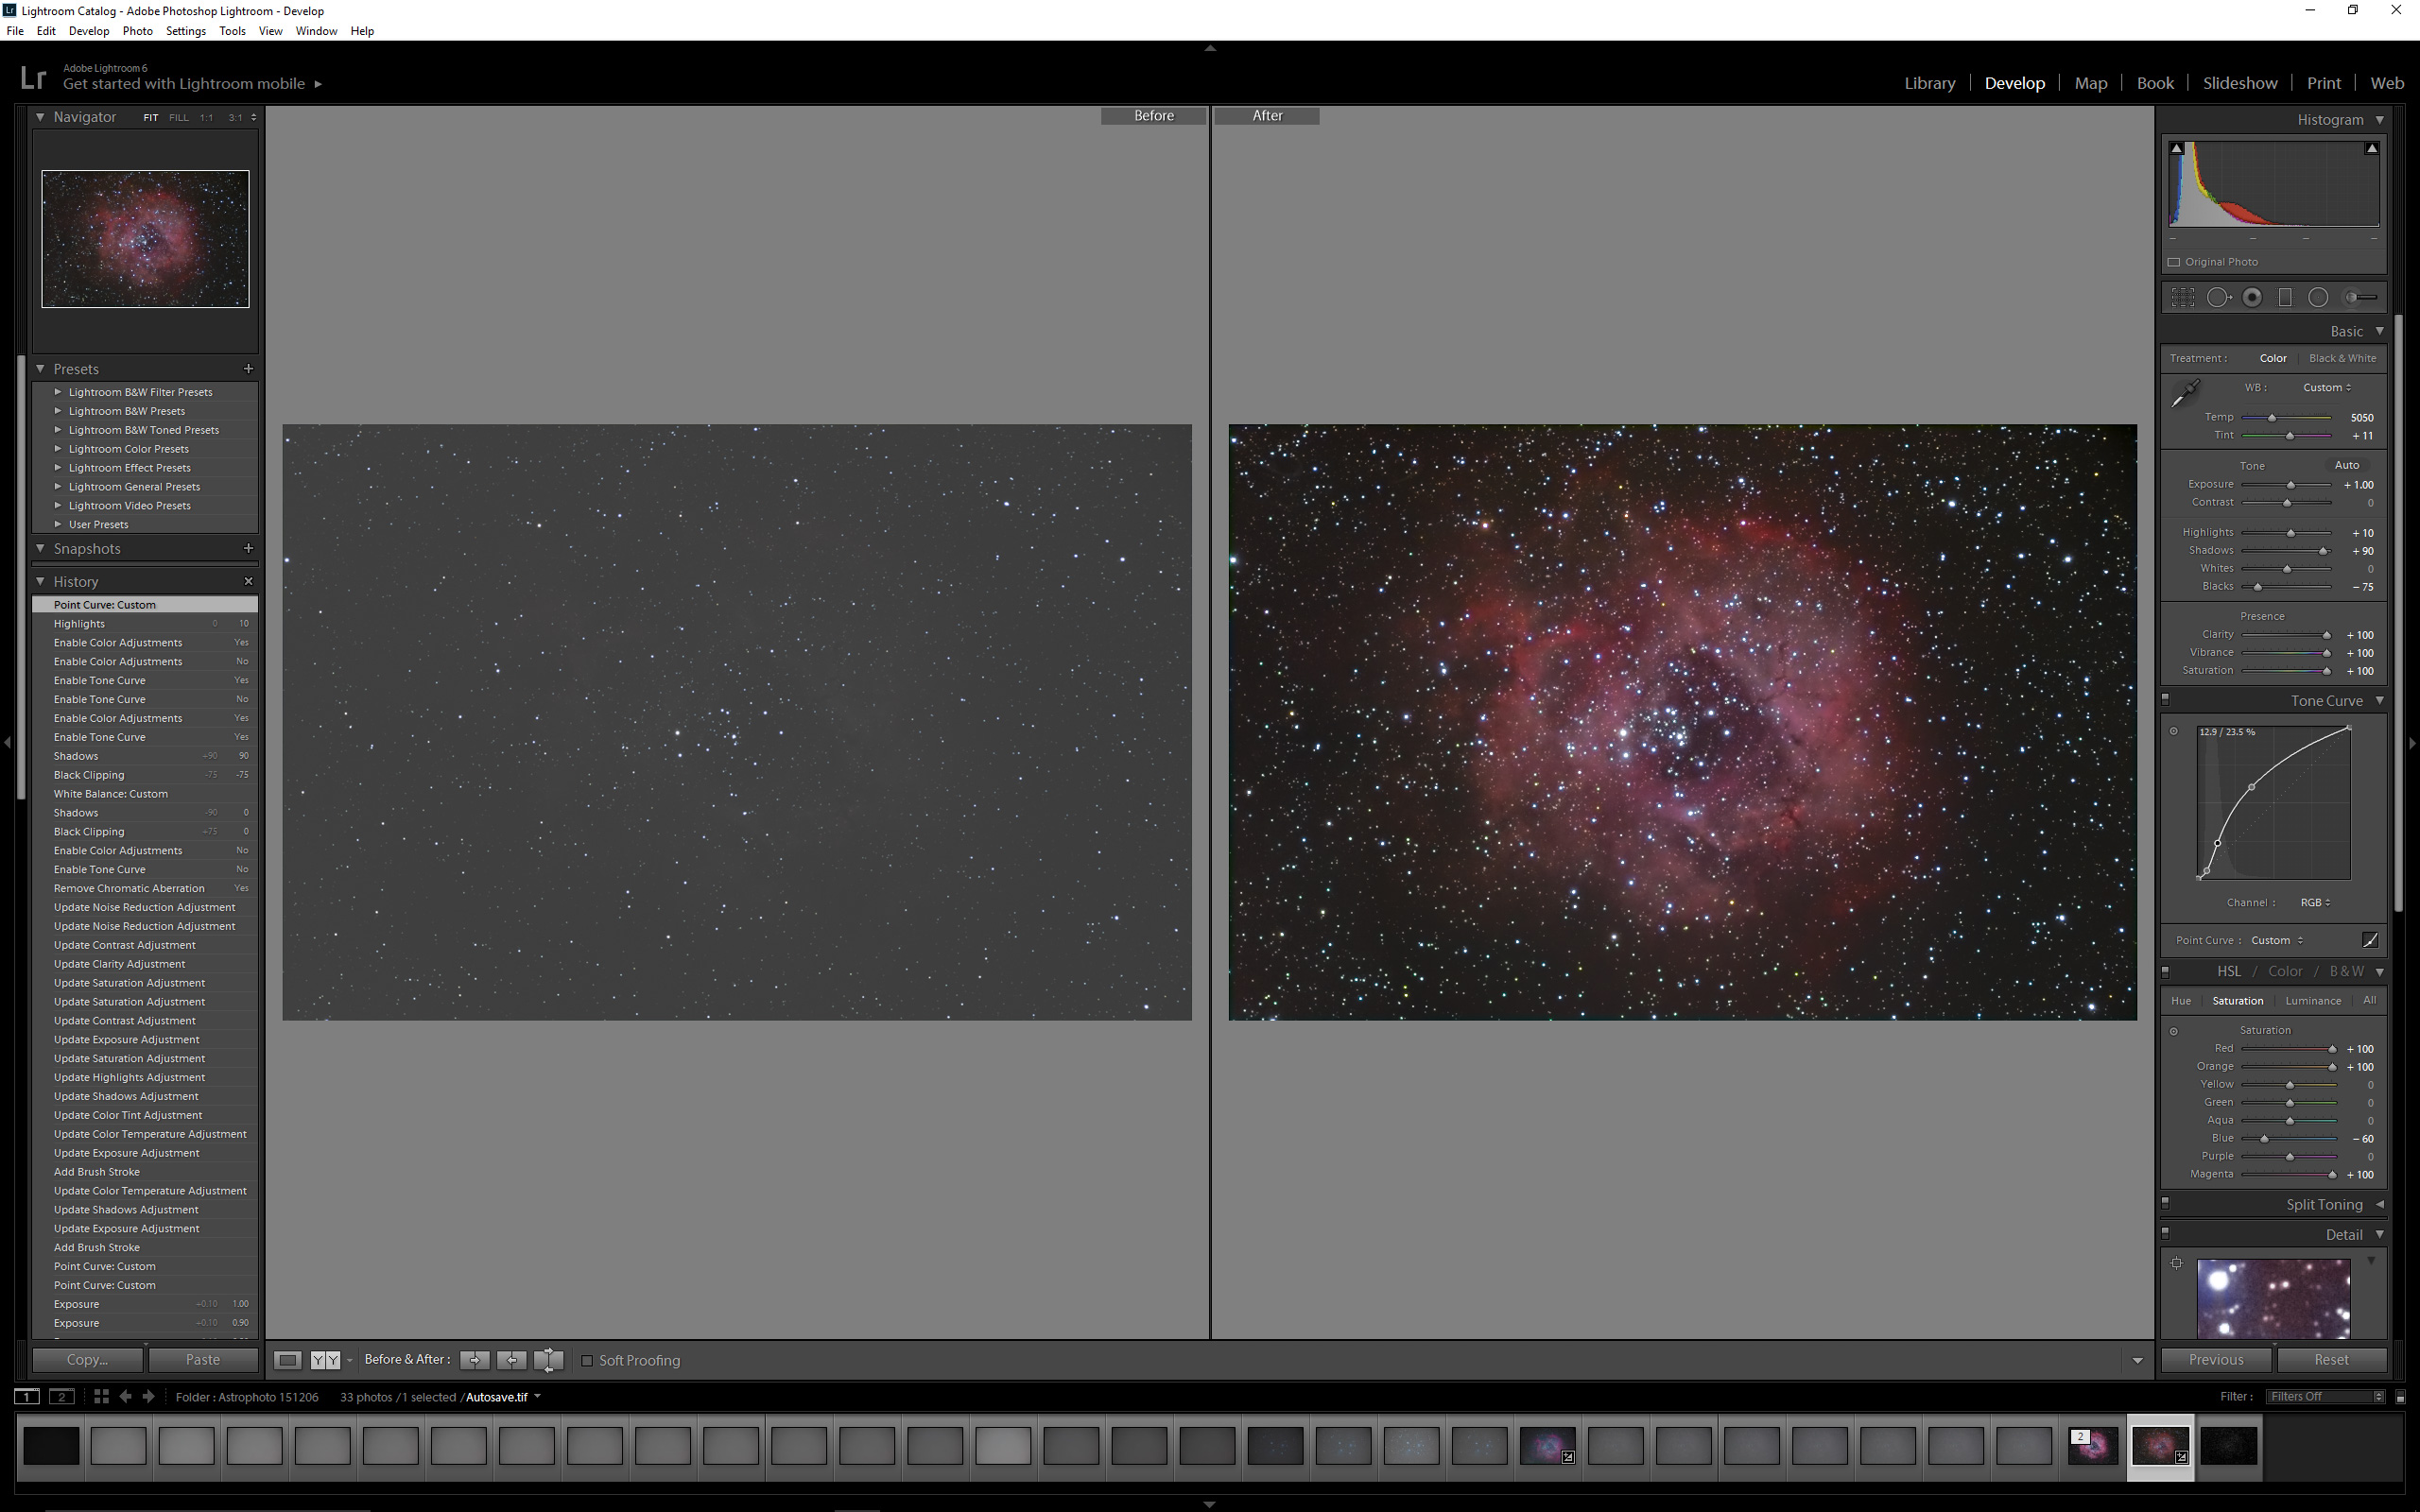
Astro Image Processing – Lightroom
At this point, it’s possible to adjust the tonal values so that we can see a colorful nebula against the blackness of space. To get the tonal values in the ballpark, we first add exposure until the nebula starts to become prominent. Then we lower the Black values until the background of space is nearly black. Finally, we raise the Shadow and Highlight values to further emphasize the nebula and get better separation from the background. The White slider does not get adjusted, because it only affects the near white values, which in the case of astro images are stars. Increasing the White slider will cause the stars to bloat. Each image is different and requires some experimentation with the slider values to get a pleasing result, but the workflow stays the same.
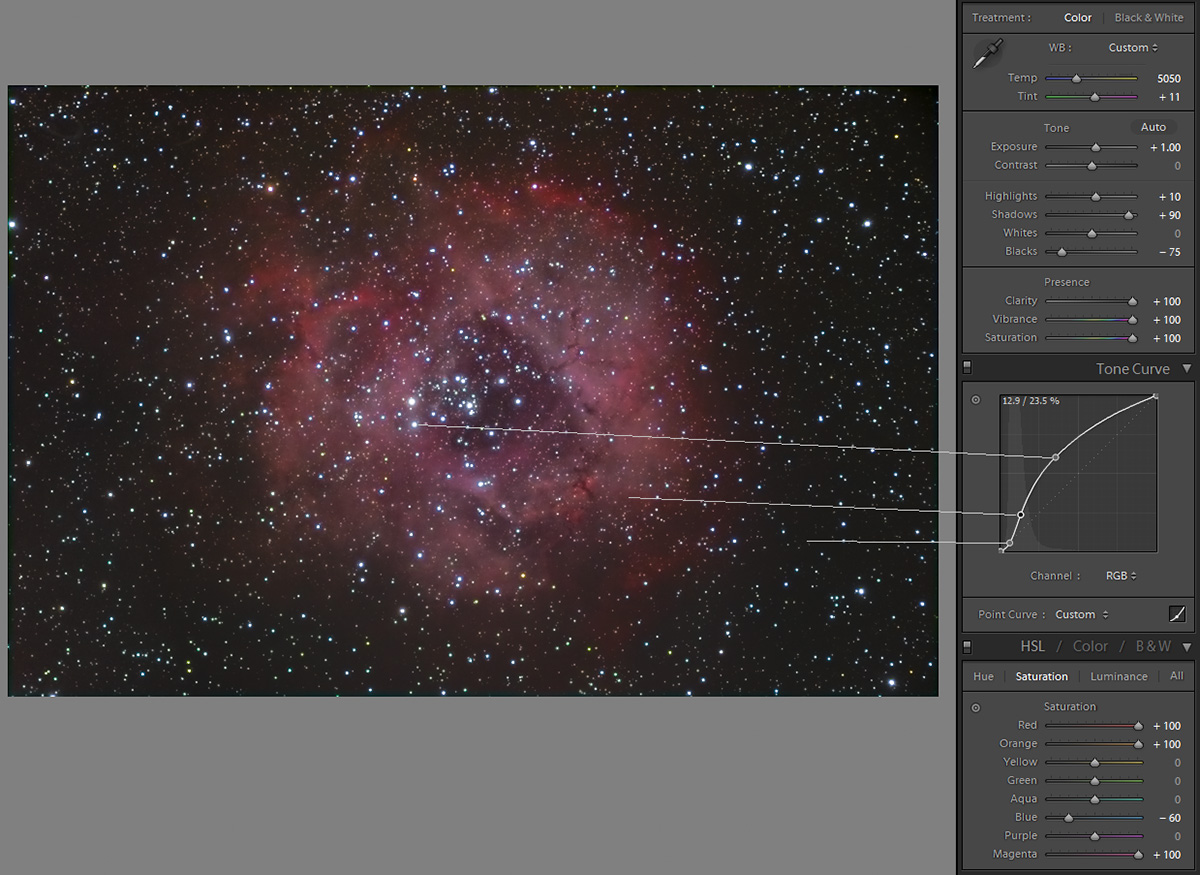
Astro Image Processing – Tone Curve
Working down the Develop panels in Lightroom, we next make more accurate tonal adjustments using the Tone Curve. For many people, this is the most vexing adjustment in any image editing program. Fortunately, Lightroom makes it relatively easy to adjust curves by allowing you to simply click on a tone within the image and drag it up or down to brighten or darken that tone. In the Tone Curve image you can see which parts of the image I selected and how I dragged the curve up or down to emphasize the subject. I kept the blacks of space near zero, while raising the value of the nebula and brighter areas around the stars. Again, some experimentation is in order.
The final part of the global color and tone adjustments is done in the Hue Saturation Luminance (HSL) panel. This panel allows you to fine tune the color by selecting and adjusting individual colors. In our Rosette Nebula example, the nebula itself is almost completely in the red end of the spectrum, including hues of magenta, red, and orange. I was able to further amplify the signal from the nebula by increasing the saturation of just those colors. The blue channel, on the other hand, was reduced in saturation because some of the blue fringing, or chromatic aberration, from the telescope optics became problematic. This was only visible 100% views of the full resolution image.
Pixel level details, such as chromatic aberration, image noise, and sharpness, are further corrected with the Detail and Lens Correction panels. Take care not to over sharpen astro images because sharpening halos around stars aren’t pretty. A small amount of sharpening and luminance noise reduction are usually helpful. The color noise reduction option can, however, be used liberally and without bad consequence. Finally, there are two options in the Lens Correction panel that are always useful for astro imaging, removal of Chromatic Aberration and Defringing. All but the most elite optics show some degree of color fringing around brighter stars. The Lens Correction panel saves you a small fortune by eliminating most of this aberration from the image.
This overview of astro image processing in Lightroom touched on the basic steps in the workflow of global image adjustments. Tools in both Lightroom and Photoshop allow you to select specific parts of your image and apply similar adjustments to local areas. The selection tools vary, but the principle behind the adjustments stays the same. In all cases, we are trying to amplify a weak signal to emphasize the subject.
Astrophotography image processing can be summarized as a two stage process, first reducing the noise and then amplifying the signal. Because deep space objects are so dim as to be below the sensitivity of human vision, astro imaging pushes the limits of what current camera technology can record. By stacking multiple images and calibrating the data, we can eliminate much of the noise inherent in our imaging equipment. This gives us a file that has enough flexibility to handle the rigors of post processing. Only then, with the careful use of image editing software, can we amplify the signal until a cosmic jewel emerges from the darkness.
Leave A Comment